Amazon QuickSight Embedding: Adding Analytics to Your SaaS Application
Quick summary: Embedding QuickSight dashboards in your SaaS product gives every customer analytics without building a BI layer from scratch. Here is the complete implementation guide — embedding types, authentication, row-level security, and cost.
Key Takeaways
- Here is the complete implementation guide — embedding types, authentication, row-level security, and cost
- You handle authentication; QuickSight handles the analytics infrastructure
- This guide walks through the full implementation: architecture, authentication, row-level security, multi-tenant patterns, the Amazon Q in QuickSight embedding capability, and cost optimization
- Amazon Athena: Direct query against your S3 data lake
- Amazon RDS / Aurora: Direct JDBC connection
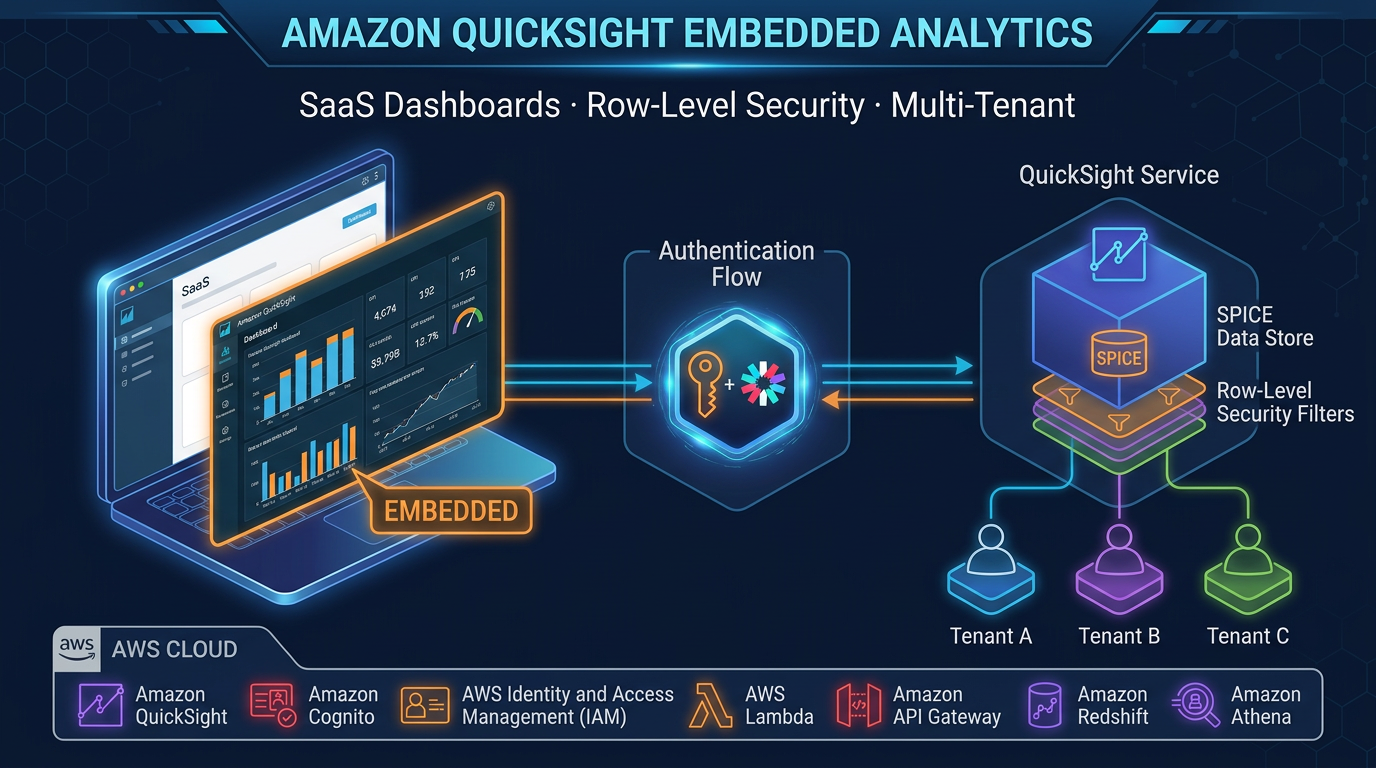
Table of Contents
Every SaaS product eventually needs analytics. Your customers want to understand their own data — usage trends, revenue breakdowns, operational metrics, performance over time. The question is whether you build a BI layer yourself or embed a managed analytics service into your product.
Building analytics from scratch means designing a query engine, building chart components, handling multi-tenant data isolation, writing export functionality, and maintaining all of it as your data model evolves. It is months of engineering work that does not differentiate your core product.
Amazon QuickSight embedding gives you a production-grade BI layer with 40+ chart types, natural language queries via Amazon Q in QuickSight, paginated reports, mobile responsiveness, and SPICE in-memory caching — embedded directly in your application with a JavaScript SDK. You handle authentication; QuickSight handles the analytics infrastructure.
This guide walks through the full implementation: architecture, authentication, row-level security, multi-tenant patterns, the Amazon Q in QuickSight embedding capability, and cost optimization.
Embedding Architecture Overview
The embedding flow has three stages:
1. User loads your app page with a dashboard component
        │
        ▼
2. Your frontend calls your backend API: "give me an embed URL for this dashboard"
        │
        ▼
3. Your backend (Node.js / Python / Java):
   - Verifies user authentication (your session / JWT)
   - Calls AWS SDK: QuickSight.GenerateEmbedUrlForRegisteredUser()
   - Returns signed URL to frontend (valid 15 minutes, single-use)
        │
        ▼
4. Frontend: QuickSight Embedding SDK renders the dashboard in an iframe
   using the signed URL
        │
        ▼
5. QuickSight queries your data source (Redshift / Athena / RDS / SPICE)
   Applies RLS rules for the authenticated user
   Returns rendered dashboard
Your application never exposes QuickSight credentials to the browser. The signed embed URL is time-limited and scoped to a specific dashboard and user identity. This is the security contract: your backend generates one URL per page load, per user.
Step 1: QuickSight Account Setup for SaaS
Data Sources
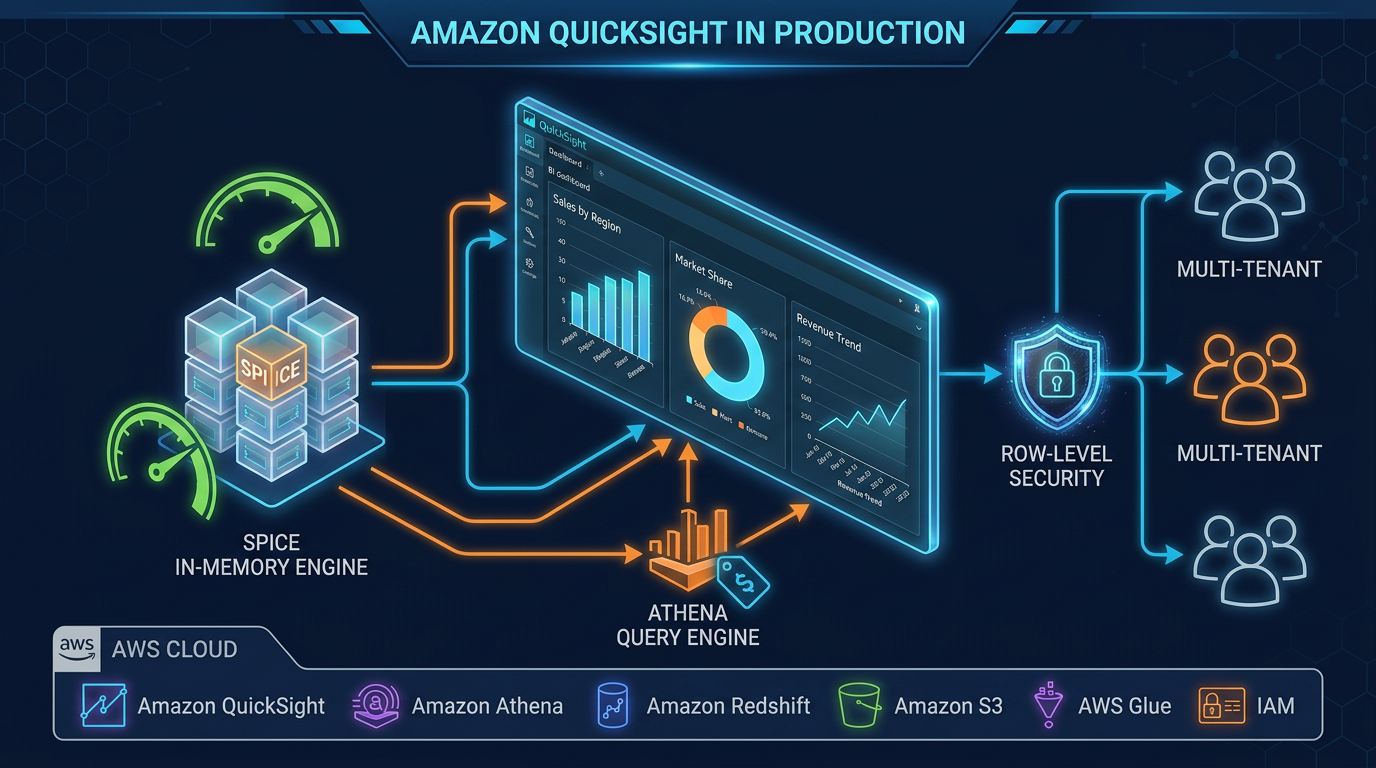
QuickSight connects to your data through direct query or SPICE (Super-fast, Parallel, In-memory Calculation Engine):
- Amazon Redshift: Direct SQL query or SPICE import. Direct query for fresh data; SPICE for dashboards where a few hours of lag is acceptable and you want faster load times.
- Amazon Athena: Direct query against your S3 data lake. Athena queries are billed per scan, so cache frequently-accessed data in SPICE to reduce both cost and query latency.
- Amazon RDS / Aurora: Direct JDBC connection. Good for smaller operational datasets.
- S3: Via manifest file (list of S3 object locations). Useful for one-off data loads.
For SaaS embedding with multiple tenants, a single Redshift cluster or Athena data lake with all tenant data is the standard approach. Tenant isolation is handled at the QuickSight layer via Row-Level Security, not by having separate databases.
Datasets and RLS
A QuickSight dataset is a named connection between QuickSight and a data source, including any column transformations, calculated fields, and RLS rules. Dashboards are built on datasets; users interact with dashboards.
For multi-tenant SaaS, every dataset that contains tenant-specific data needs an RLS dataset applied.
Step 2: IAM Role for Embedding
Your backend assumes an IAM role with permissions to call the QuickSight embedding APIs. Create a role with this policy:
{
  "Version": "2012-10-17",
  "Statement": [
    {
      "Effect": "Allow",
      "Action": ["quicksight:GenerateEmbedUrlForRegisteredUser", "quicksight:GenerateEmbedUrlForAnonymousUser"],
      "Resource": "*"
    },
    {
      "Effect": "Allow",
      "Action": ["quicksight:RegisterUser", "quicksight:DescribeUser"],
      "Resource": "arn:aws:quicksight:us-east-1:123456789:user/default/*"
    }
  ]
}
Scope RegisterUser and DescribeUser to your QuickSight namespace ARN rather than * in production.
Step 3: Row-Level Security Setup
RLS is the mechanism that ensures tenant A’s users never see tenant B’s data, even though both are stored in the same Redshift table.
Creating an RLS Dataset
Create a table (in Redshift or as a CSV in S3) that maps QuickSight usernames to the filter values they are allowed to see:
-- In Redshift: quicksight_rls.user_tenant_mapping
CREATE TABLE quicksight_rls.user_tenant_mapping (
    UserName  VARCHAR(256),  -- QuickSight username (must match exactly)
    tenant_id VARCHAR(64)    -- value that matches the tenant_id column in your fact tables
);

-- Example rows
INSERT INTO quicksight_rls.user_tenant_mapping VALUES
    ('user@acme.com',   'tenant-001'),
    ('user2@acme.com',  'tenant-001'),
    ('user@globex.com', 'tenant-002');
Create a QuickSight dataset pointing to this table, then apply it as an RLS dataset to your main fact datasets. When QuickSight processes a query for user@acme.com, it automatically appends WHERE tenant_id = 'tenant-001' to every query run for that user. The user cannot override this filter.
Registering QuickSight Users at First Login
When a user first accesses your embedded dashboard, register them in QuickSight:
import boto3

qs_client = boto3.client('quicksight', region_name='us-east-1')
AWS_ACCOUNT_ID = '123456789012'

def register_or_get_quicksight_user(email: str, namespace: str = 'default') -> str:
    """Register a user in QuickSight if they don't exist. Returns the user ARN."""
    try:
        response = qs_client.describe_user(
            AwsAccountId=AWS_ACCOUNT_ID,
            Namespace=namespace,
            UserName=email,
        )
        return response['User']['Arn']
    except qs_client.exceptions.ResourceNotFoundException:
        pass

    response = qs_client.register_user(
        AwsAccountId=AWS_ACCOUNT_ID,
        Namespace=namespace,
        IdentityType='IAM',
        Email=email,
        UserRole='READER',
        IamArn=f'arn:aws:iam::{AWS_ACCOUNT_ID}:role/QuickSightEmbedRole',
        SessionName=email,
    )
    return response['User']['Arn']
Register users as READER role — they can view dashboards but cannot edit or create content. READER users are billed at the session rate, not the per-user author rate.
Step 4: Backend — Generating the Signed Embed URL
Generate a fresh signed URL for each page load. The URL is single-use and expires in 15 minutes.
def get_dashboard_embed_url(
    email: str,
    dashboard_id: str,
    allowed_domains: list[str],
) -> str:
    """Generate a signed QuickSight embed URL for an authenticated user."""

    user_arn = register_or_get_quicksight_user(email)

    response = qs_client.generate_embed_url_for_registered_user(
        AwsAccountId=AWS_ACCOUNT_ID,
        SessionLifetimeInMinutes=60,  # Session duration; max 600 minutes
        UserArn=user_arn,
        ExperienceConfiguration={
            'Dashboard': {
                'InitialDashboardId': dashboard_id,
            }
        },
        AllowedDomains=allowed_domains,  # e.g., ['https://app.yourproduct.com']
    )

    return response['EmbedUrl']
Expose this as an authenticated API endpoint in your application. Your frontend calls it with the user’s session token; your backend validates the session, calls QuickSight, and returns the embed URL. The URL itself contains no user credentials — it is a signed token scoped to one session.
Step 5: Frontend — Rendering with the QuickSight Embedding SDK
Install the SDK:
npm install @amazon/amazon-quicksight-embedding-sdkRender the dashboard:
import { createEmbeddingContext } from '@amazon/amazon-quicksight-embedding-sdk';

async function embedDashboard(containerElement: HTMLElement, dashboardId: string) {
  // Fetch the signed URL from your backend
  const response = await fetch(`/api/quicksight/embed-url?dashboardId=${dashboardId}`, {
    credentials: 'include', // include session cookie
  });
  const { embedUrl } = await response.json();

  // Create embedding context
  const embeddingContext = await createEmbeddingContext();

  // Embed the dashboard
  const embeddedDashboard = await embeddingContext.embedDashboard({
    url: embedUrl,
    container: containerElement,
    width: '100%',
    height: '700px',
    resizeHeightOnSizeChangedEvent: true,
    onChange: (changeEvent) => {
      if (changeEvent.eventName === 'FRAME_LOADED') {
        console.log('Dashboard loaded successfully');
      }
    },
  });

  return embeddedDashboard;
}
The SDK renders an iframe with the QuickSight session. The onChange callback receives lifecycle events: FRAME_LOADED, ERROR_OCCURRED, PARAMETERS_CHANGED, and more. Wire error events to your application’s error logging.
Updating Parameters at Runtime
After embedding, you can control dashboard filters from your application without reloading the iframe:
// Filter the dashboard to a specific date range
await embeddedDashboard.setParameters([
  { Name: 'start_date', Values: ['2026-01-01'] },
  { Name: 'end_date', Values: ['2026-04-18'] },
]);

// Reset to show all data
await embeddedDashboard.setParameters([{ Name: 'start_date', Values: [] }]);
This is useful for date pickers, region selectors, or product category filters in your application’s UI that should drive the embedded dashboard.
Multi-Tenant Isolation Patterns
Three patterns for multi-tenant QuickSight embedding, ordered from simplest to most isolated:
Pattern 1: Row-Level Security (Recommended for Most Cases)
All tenants share one QuickSight account, one set of datasets, and one set of dashboards. RLS rules (the user_tenant_mapping table described above) enforce data isolation at query time.
Pros: Simple to manage. One dashboard definition covers all tenants. Adding a new tenant means adding rows to the RLS table, not creating new QuickSight objects.
Cons: All tenants see the same dashboard layout and metrics. You cannot give tenant A a different dashboard design than tenant B. Maximum dataset size per QuickSight account applies to the combined multi-tenant data.
Pattern 2: QuickSight Namespaces
QuickSight namespaces provide logical isolation within one account — separate user registries, separate dashboard permissions. Users in namespace tenant-001 cannot access resources in namespace tenant-002.
# Create a namespace per enterprise tenant
qs_client.create_namespace(
    AwsAccountId=AWS_ACCOUNT_ID,
    Namespace='tenant-001',
    IdentityStore='QUICKSIGHT',
)
Register users into their tenant-specific namespace. Generate embed URLs with the Namespace parameter set to the tenant’s namespace. Each namespace gets its own set of registered users and access controls.
Use when: You have enterprise customers who require strict logical isolation, custom branding per tenant, or different dashboard configurations per tenant.
Pattern 3: Dynamic Data Source Parameters
For maximum flexibility, pass tenant-specific data source configuration at embed time via session tags. When generating the embed URL, inject a tag that QuickSight passes to your data source:
response = qs_client.generate_embed_url_for_registered_user(
    ...
    ExperienceConfiguration={
        'Dashboard': {
            'InitialDashboardId': dashboard_id,
        }
    },
    # Session tags passed to the data source at query time
    # Requires dataset configured to use session tag values
)
Combined with Redshift row-level security (using current_setting('app.current_tenant_id')) or Athena partition filters, this allows fully dynamic tenant isolation without a static RLS lookup table.
Amazon Q in QuickSight Embedding
Amazon Q in QuickSight is the AI-powered natural language interface built into QuickSight. It is embeddable separately from dashboards — you can surface a Q search bar inside your application so users can ask questions in plain English and get instant visual answers.
Embedding the Q Search Bar
const embeddedQSearchBar = await embeddingContext.embedQSearchBar({
  url: qSearchBarEmbedUrl,
  container: containerElement,
  onChange: (changeEvent) => {
    if (changeEvent.eventName === 'Q_SEARCH_CLOSED') {
      containerElement.style.display = 'none';
    }
  },
});

// Programmatically set an initial question
await embeddedQSearchBar.setQuestion('Show me revenue by region for last quarter');
Generate the Q search bar embed URL with GenerateEmbedUrlForRegisteredUser and the QSearchBar experience configuration:
response = qs_client.generate_embed_url_for_registered_user(
    AwsAccountId=AWS_ACCOUNT_ID,
    SessionLifetimeInMinutes=60,
    UserArn=user_arn,
    ExperienceConfiguration={
        'QSearchBar': {
            'InitialTopicId': 'your-topic-id',  # Q Topic defined in QuickSight
        }
    },
    AllowedDomains=allowed_domains,
)
A Q Topic is a curated semantic layer defined in QuickSight — it maps business-friendly names to dataset columns, defines metrics (e.g., “revenue” = SUM(order_amount)), and configures which questions the topic can answer. Authors define topics in QuickSight; end users query topics in natural language.
Amazon Q in QuickSight: Executive Summaries
Amazon Q in QuickSight can automatically generate written summaries of dashboard data — narrative text describing the key insights in a dashboard, generated from the actual data. These summaries are visible in embedded dashboards when the feature is enabled for your QuickSight subscription tier.
Snapshot Export: Scheduled PDF Reports
For customers who need reports emailed on a schedule (a common SaaS feature: “email me my monthly revenue report”), use the QuickSight Snapshot Export API rather than maintaining a separate reporting system.
Architecture for Scheduled Reports
EventBridge Scheduler (monthly)
        │
        ▼
Lambda function
  - Calls QuickSight.StartDashboardSnapshotJob()
  - Parameters: dashboard ID, user ARN, output format (PDF/PNG)
        │
        ▼
QuickSight renders dashboard as PDF
Writes to S3 (your specified bucket)
        │
        ▼
Lambda (triggered by S3 event)
  - Reads PDF from S3
  - Sends via Amazon SES to customer email
import boto3
import uuid
qs_client = boto3.client('quicksight', region_name='us-east-1')
def start_dashboard_snapshot(dashboard_id: str, user_arn: str, s3_bucket: str) -> str:
"""Start an async dashboard snapshot export. Returns job ID."""
job_id = str(uuid.uuid4())
qs_client.start_dashboard_snapshot_job(
AwsAccountId=AWS_ACCOUNT_ID,
DashboardId=dashboard_id,
SnapshotJobId=job_id,
UserArn=user_arn,
SnapshotConfiguration={
'FileGroups': [
{
'Files': [
{
'SheetSelections': [
{'SheetId': 'sheet-1', 'SelectionScope': 'ALL_VISUALS'}
],
'FormatType': 'PDF',
}
]
}
],
'DestinationConfiguration': {
'S3Destinations': [
{
'BucketConfiguration': {
'BucketName': s3_bucket,
'BucketPrefix': f'reports/{dashboard_id}/',
}
}
]
},
},
)
return job_idThe snapshot job is asynchronous. Poll DescribeDashboardSnapshotJob for completion, then retrieve the PDF from S3 and send it via SES. A typical dashboard renders to PDF in 10-30 seconds.
Cost Optimization
QuickSight embedding costs depend on your pricing tier and usage pattern. Two models are relevant for SaaS:
Session Pricing
You pay per 30-minute reader session. A user who logs in and views dashboards for 25 minutes consumes one session. Logging in again 35 minutes later (or the next day) starts a new session.
Session pricing is economical for SaaS products where users check dashboards infrequently — a few times per week. If your average user views dashboards for 2 sessions per month, session pricing scales well with your user base.
Capacity Pricing
A fixed monthly fee for unlimited reader sessions. More economical when users access dashboards frequently (daily active use) or when you have large user bases where per-session billing adds up.
For most SaaS products in growth stage, start with session pricing. As your embedded analytics feature gains adoption and daily active dashboard views climb, re-evaluate against capacity pricing.
SPICE: Reduce Query Costs with In-Memory Caching
SPICE is QuickSight’s in-memory data store. Import your Redshift or Athena data into SPICE, and dashboard queries run against in-memory data rather than executing live queries against your warehouse.
Benefits for cost optimization:
- Athena: Each live query costs ~$5/TB scanned. SPICE imports amortize that cost across many dashboard views. If 500 users view a dashboard daily and the underlying Athena query scans 1 GB, session pricing is $2.50/day for Athena cost alone. A SPICE import of that 1 GB dataset runs once, costs $0.005 in Athena scan cost, and serves all 500 users.
- Redshift: SPICE reduces Redshift concurrency load and latency.
SPICE storage is priced per GB-month. Run refresh jobs (full or incremental) on a schedule that matches your data freshness requirements. QuickSight supports incremental SPICE refresh for datasets with a timestamp-based look-back window.
One Dashboard per Tenant Tier, Not per Tenant
Avoid creating separate QuickSight dashboards per tenant. Instead, design dashboards that work for all tenants, using RLS and parameters to provide the appropriate data view. One dashboard definition serves 10,000 tenants. This eliminates the management overhead of maintaining thousands of nearly-identical dashboard objects and keeps your QuickSight object count manageable.
What FactualMinds Recommends
Embedding QuickSight in a SaaS product is one of the highest-leverage analytics investments you can make. The implementation is well-defined, the security model (RLS + signed URLs) is robust, and the ongoing maintenance is minimal compared to a homegrown BI layer.
The key decisions are:
- Multi-tenancy pattern: Start with RLS for most cases. Migrate to namespaces if enterprise customers require strict logical isolation.
- Pricing model: Start with session pricing; revisit at scale.
- SPICE vs live query: Use SPICE for any dashboard that will be viewed more than a few times daily; live query for operational dashboards that need sub-minute data freshness.
- Amazon Q in QuickSight: Embed the Q search bar as a differentiating feature — natural language analytics is a meaningful product capability that most SaaS products do not offer.
Done well, embedded QuickSight analytics becomes a retention driver: customers who actively use analytics features within your product churn significantly less than those who do not.
Related reading
- Amazon Redshift Serverless vs Provisioned: Which Is Right for Your Workload?
- Real-Time Stream Processing with Amazon Managed Service for Apache Flink
- Amazon Athena Cost Optimization: Partition Pruning, Compression, and Iceberg Tables
- AWS EMR: Serverless vs EC2 vs EKS — When to Use Each
- AWS Glue 5: Modern ETL with Apache Iceberg — Tables, Time Travel, and Lakehouse Patterns
- AWS Glue vs dbt on AWS: Data Transformation Decision Guide for 2026
- Virtual Data Modeling on AWS: Architecture, Trade-offs, and When Not to Use It
- How to Build a Serverless Data Pipeline with AWS Glue and Athena
AWS Cloud Architect & AI Expert
AWS-certified cloud architect and AI expert with deep expertise in cloud migrations, cost optimization, and generative AI on AWS.